Navigation Menu

Lush Aesthetics: LED Teeth Whitening [Sponsored Review]

Hi everyone!
I hope the festive season has been very pleasant for all of you despite our constant melted snow showers. Talking about Christmas, the phrase "All I want for Christmas is my two front teeth" is no stranger to everyone and I can remember the time when I was oddly toothless too. Those were the days, fast forward the years and now, all my milk teeth are gone and my teeth are all fully grown.


Then comes the issue that most of us will face... teeth with stains :/

Granted, I have been rather blessed~ I have my fair share of proper oral hygiene habits (credits to my scary school dental nurse form my River Valley Days), and have gotten a couple of whitening treatments in the past during my active pageant days because no queen is queen worthy without a sparkly smile ;) But my constant love for teas meant that I can't keep my teeth pearly white for long.

Being a big tea drinker, my sparkly teeth don't last long.


A few days before Christmas, I was blessed to get "Sparkly White Teeth" by Lush Aesthetics. In the past, the whitening treatments that I have done are: Whitening Toothpaste, Whitening Strips and Tray-based tooth whitening. These treatments require patience and dedication to see results as they are rather time-consuming,


The whitening treatment offered by Lush Aesthetics is their LED Teeth Whitening. 


SO HOW DOES LED WHITENING WORKS?


Our teeth suffers discolorations from various factors – aging, smoking, coffee stains, wine stains and medication. The LED Teeth Whitening brightens and lightens your teeth dramatically in less than an hour. The LED Teeth Whitening technology uses a non-peroxide gel and provides a quick effective, painless and non-invasive solution for a bright white smile.

The treatment is suitable for people with sensitive teeth. It is safe and effective with no damage to teeth enamel or structure. There is no use of heat, needles or drills during the procedure.


STEPS

Consultation

Before the start of the treatment, the consultant would provide me with a breakdown of the treatment and evaluate the shade of my current teeth in the Consultation Room.

I was also informed about the possible outcomes of the treatment and all the possible side effects that might happened after the treatment: ucler, soreness of teeth and gum, increased in sensitivity, white spots on teeth etc.

Rinsing of Mouth

Then, I was brought to the treatment room with a tiny cup of mouthwash on the sink for me to rinse my mouth with.


Preparation, Lips and Gums Protection

After rinsing my mouth, I laid down on the bed provided and I had vaseline applied to my lips before a cheek retractor was fitted into my mouth. Then, a layer of gelish gum protector was applied diligently and set with a few seconds of LED light.


Application of Whitening Gel

This process involves applying the non-peroxide whitening gel on the teeth. 


The next step was to expose the whitening gel to the LED light which will activate the ingredients in the gel to whiten and brighten the teeth. The upper and lower teeth are treated at the same time. 


Each LED Light Exposure time is for 20mins and there is a timer countdown on machine screen to inform you of the duration of the treatment.


During this duration, I was left alone to relax with a bell to ring if I needed any assistance. It requires a little focus to keep my head still and to expose both my upper and lower teeth to the light. I had to keep my mouth slightly open as my upper row of teeth covers the lower when I bite. As for the sensation, it was slightly warm and there was some tightness around mouth area but it is all pretty tolerable.  The other discomfort that I had was when my saliva pooled in my mouth, which I ended up swallowing... after that, I learnt not to "store" my saliva. Haha.

I thought that it was nice that I was checked upon after 10mins, on the consultant own's accord, to ensure that I am comfortable.

If you are an anxious sort of person and 20 minutes may seem relatively long to you, the best bet is to close eyes, relax and mediate. The machine will beep when there is 1 minute left and prompt when the 20 minutes are over.

This process is repeated twice, where the gel will be wiped off and reapplied once more and left exposed to the LED Light for another 20 minutes.


Removal

Once the second 20 minutes of LED Light Exposure period is over, the whitening gel will be wiped off with cotton buds and the gum protector will be removed with a toothpick. Then, the cheek retractor will be taken out and the treatment ends with a final mouthwash rinse.


VERDICT

Duration: About 1 hour (40 minutes of LED Light Exposure + 20 minutes of Preparation and Removal Time)

Overall Ambiance: A mix between a clinic and a spa. The room that I was in has a mini sink for rinsing.


Effectiveness: The effectiveness of the treatment is pretty visible straight after treatment. The underlying yellowish tint of my teeth are significantly lighter.


Right after treatment, we did another comparison of the shades of my teeth and boy~ was I amazed!
My results are 5 shades lighter in an hour after treatment!


From S26/24 to S14/12
(Shades in this photo looks more yellowish due to the lighting in the room)
 As for the side effects, my gums were slightly sore for 5 days after treatment and I had a mini ulcer on the lip that developed after 2 days (took 3 days to heal). There wasn't any increased sensitivity with my teeth or any permanent white spots.

As for the longevity of the results, I was told that the results can be rather long term, lasting for years depending on your lifestyle habits. Here's a comparison photo after 10 days:

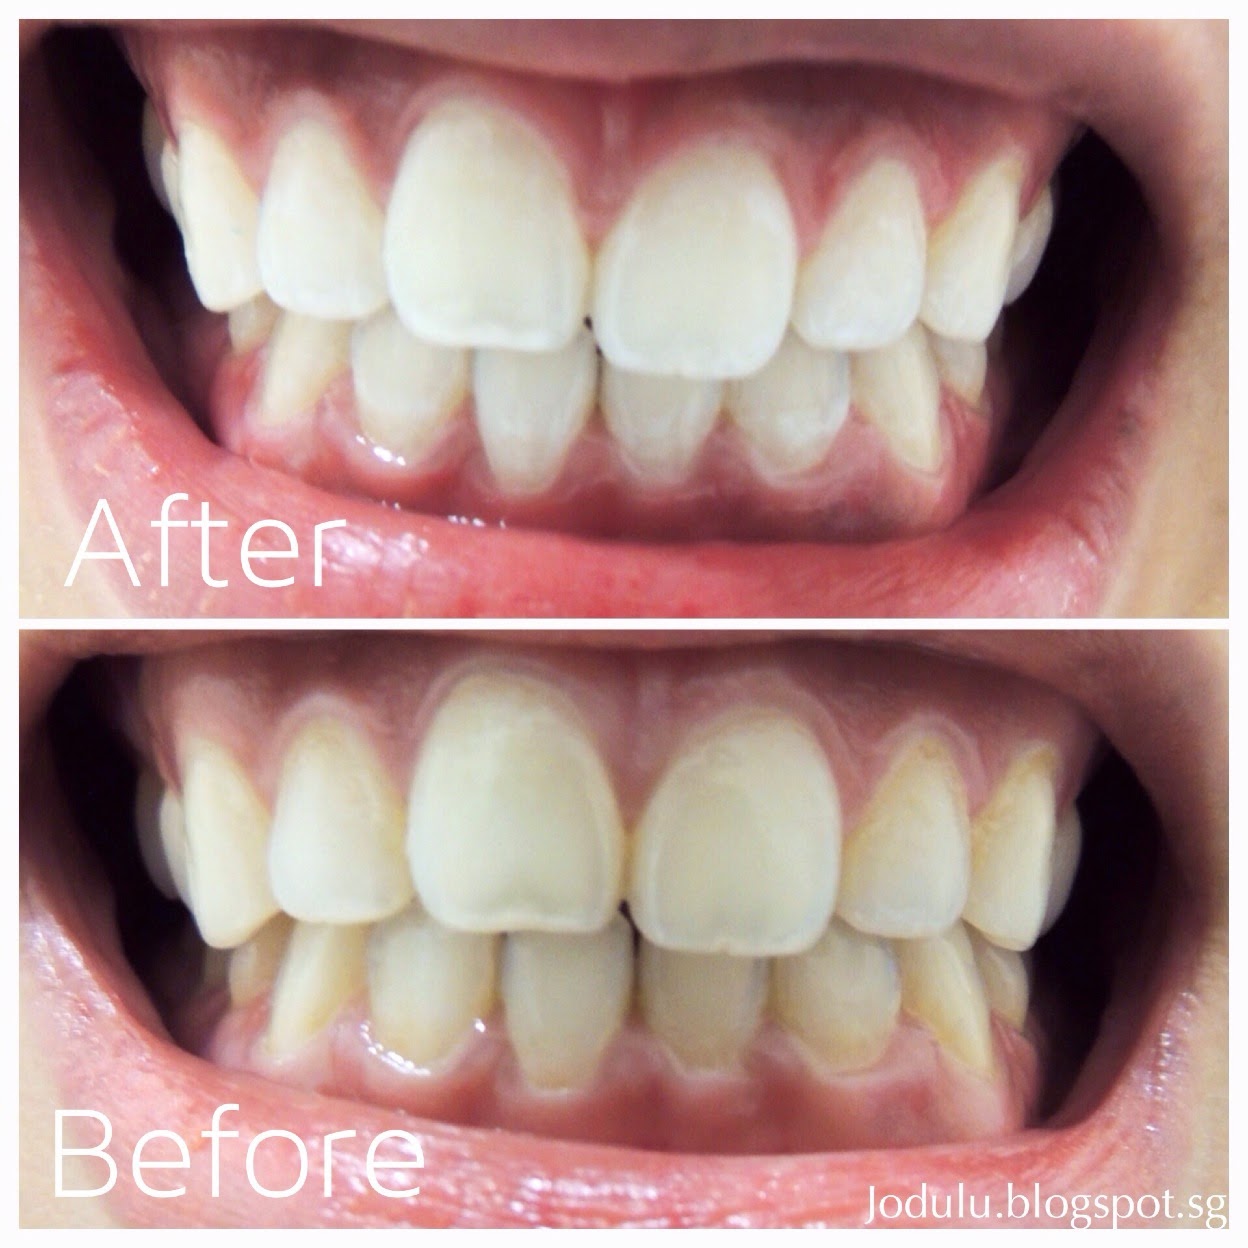
Before: Taken before I started treatment.
After: This is the result of my teeth after 10 days with my usual lifestyle habits with a slight reduction in the consumption of black tea.


Promotional Offer

Simply complete the form on their Promotional Page HERE with your preferred appointment date and time to register to try out LED Teeth Whitening at a special rate of:

Only $188 For 1 Session of Full Set LED Teeth Whitening 


Terms & Conditions:

Valid Only For First Time Customers Age 21 and Above
Valid for Existing Customers who have not visited in the last 6 months
Valid For Everyone Except Tourists
Only 1 Redemption Per Person 
Multiple purchases can be bought as gifts for family/friends 
Appointment Required


0 comments:

OMY.SG: Panasonic Cooking Demo Session with Panasonic bread maker SD-P104

Last weekend, I attended Panasonic cooking demo session that was co-organised with OMY.SG and taught by women with experience! It was held in a pretty small room, with Panasonic home appliances all around and mind you, we are talking about convectional and microwave ovens!


What with Christmas approaching, this session taught us how to ultilise Panasonic bread maker SD-P104 to make breads, buns and even the local delight, muah chee! I'm amazed by how one little appliance can  be used to create so many things, one of the lady even made jams with it! 


It was a demonstrating session, and it was challenging to see from the back, would have loved the session more if it was a hands-on (because doing is learning) but overall it was a nice session with lots of chats and food!

Talking about food, let's move on to the recipes! 
Do note that all of the food below are prepared with Panasonic bread maker SD-P104, if you do not have the same machine, adjust the instructions accordingly to yours or prepare the dough with hands and bake accordingly!

And the best part of making breads/ buns at home on your own?
You know what you are consuming!


FRAGRANT MIXED  BREAD 

75g Whole wheat flour 
175g Bread flour 
10g Butter 
1 tsp Salt 
2 tbsp Castor sugar 
1 tbsp Milk powder 
200ml Cold water 
1 tsp Instant yeast 
10g Black sesame seeds 
30g Raisins 
10g Melon seeds
30g Sunflower seeds 

Method: 

1. Place above ingredients (except mixed nut and yeast) in the bread pan. 

2. Place yeast into the yeast dispenser and nuts into the nut dispenser. 

3. Select Menu no.2 for “Rapid “ mode, and select “Raisin” mode, next press start. 

4. Once ready, remove bread from pan, leave to cool before cutting. 

*Note: Best baked in Panasonic bread maker SD-P104

Baking time: 2 hrs using “Rapid” mode


GLUTINOUS RICE KUEH (MUAH CHEE)

250g Glutinous rice flour ---mix with--- 375ml Water 
1 tbsp Shallot oil 

Serving: 
60g Fine sugar 
150g Ground peanut 
Some roasted sesame seed (blended) 
(Mix above together only when ready to serve) 

Method: 

1. Place glutinous rice flour, water, and shallot oil in bread pan 

2. Select mode no. 2, press start. 

3. In last 10 minutes, stir dough with wooden chopstick. 

4. Once ready, cut dough into bite size and coat with peanut mixture. 

5. Serve. 

Note: Cooked in Panasonic bread maker SD-P104


FLAVOURED BUN ROLLS

A. For dough: 
280g High-gluten flour 
1 tsp Salt 
50g Butter 
25g Egg (beaten) 
3 tbsp Castor sugar 
2 tbsp Milk powder 
160ml Cold water 
1 tsp Instant yeast 
Some black sesame seeds
½ Egg (for egg wash) 

B. For fillings: 
Tuna
Yellow/White Onion
Mayonnaise

C. For toppings: 
30g Mozerella cheese 
Some paprika 

Method: 

1. Add all the ingredients into the bread pan except yeast into the yeast dispenser. 

2. Select bread dough no.9, next press start. 

3. Press “Stop” when you hear the beep sound. Take out dough. 

4. Use spatula to divide the dough into 12 even pieces, shape them into balls, cover with towel, rest for about 15 mins. 

5. Shape them into desired shape.

6. Spray water on it and allow it to ferment for about 50 mins ( till dough rise double in size at a temperature of 40C).

7. Egg wash bun, and make an incision in the middle of the buns, length-wise and fill the center with the tuna mix.

8. Sprinkle cheese and paprika on top and bake in a preheated oven at 200C for about 14-15 mins. 

Note: Dough best prepared in Panasonic bread maker SD-P104. Best baked in Panasonic microwave oven NN-DF383B.


FRESH FOCACCIA 


A. For bread: 
350g Bread flour 
1¼tsp Salt 
1 tbsp Olive oil 
 225ml Cold water 
1 tbsp Castor sugar 
 1 tsp Instant yeast 
1 tbsp Milk powder 

B. For toppings: 
200g Cherry tomatoes 
80g Black olives 
2 tbsp Olive oil 
Some Black pepper 
Some rosemary & paprika 140g 
Mozzarella cheese (cut into 1cm cube) 

Method: 

1. Place all the ingredients into the bread pan except yeast in the yeast dispenser. 

2. Select menu 10 and press start. Display shows 45 minutes. 

3. Once ready, remove dough from the bread pan and knead it on a lightly floured surface until elastic and springs back when touched. 

4. Divide dough into 2 portions, shape dough into a flat circle and place it onto baking paper. 

5. Press the cherry tomatoes, black olives and mozzarella cheese into the dough. 

6. Leave dough to rise at 40C for about 50 minutes or till it doubles in size. 

7. Brush the surface with olive oil, sprinkle with black pepper, rosemary and paprika. 

8. Bake in a preheated oven at 210C for about 16 minutes.

Note: Dough best prepared in Panasonic bread maker SD-P104. Best baked in Panasonic microwave oven NN-DF383 / NN-DS592.

3 comments:

Samplestore.com: BLACK PAINT® Trial Set Promotion

I've been using BLACK PAINT® since May this year and yes, there are periods where I stop using them to review other skincare brands (part of being a beauty blogger) but I always revert back to BLACK PAINT®.

You have seen photo of my Before and After from my previous post on Black Paint, and it has worked really well for me. It hasn't been an overnight miracle but rather a progressive journey.

Black Paint Soap (Top Left), Unique One Sided Pad (Bottom Left) to be used with Best Water Toner, Oil Rose Facial Lotion, Black Sponge (Bottom Right) and Water Cream (Top Right)


Just like the success that BLACK PAINT® has achieved progressively over six years, being awarded once again for the Monde Selection Award “GRAND GOLD”, the highest ranking to rate a product that has achieved an average result between 90%- 100% for its quality.

BLACK PAINT® has been one of my favourite brands because not only is it an organic natural skincare brand (established in Kyoto 15 years ago by Miyuki Maeda), it is also based on the concept of using plant oil treatments to achieve healthy beautiful skin. 

That is why BLACK PAINT® skincare products are made from natural, organic materials which are blended from more than 100 types of plant oils, more than 50 types of essential oils, and Kishu Bichotan Charcoal that suitable for various skin and body parts. 


I have been sharing my success with BLACK PAINT® with my friends and since Sample Store approached me to share my experiences with the products, I thought that it would be great to highlight on certain key application techniques and pointers that I have come to established from my own experience and tips from the founder of BLACK PAINT®.


BLACK PAINT® Soap


Pointers:
  • Correct application of the soap is important- it has to feel like melted chocolate.
  • If it gets tricky to apply the product onto your face directly with the bar, use your fingers to scoop and apply.
  • It will get messy- great way to wash your sink clean.
  • The soap will not dry as easily as it would in a humid climate like Singapore- ensure no leftover water in your bowl.
  • Product will sting your eyes- avoid applying too close to eye until you are in the shower to rinse them off.
  • Product will turn grayish and soapy as you massage with moist hands.


BLACK PAINT® Best Water Toner


Pointers:
  • Do not skip this step- this is vital to achieving healthy pores!
  • Best used with BLACK PAINT® pads but you can also use cotton pads or facial mask- to create like a toner mask.
  • Leave it onto your face with the pads for it to be effective as supposed to merely splashing and patting onto your face.

Personally, after cleansing, I pump 6-8 pumps onto the pads and leave them on my face for 10mins. This method makes a huge difference in my skin, not only does it make my skin feel more hydrated but it also aids in the absorption of BLACK PAINT®Oil Water!


BLACK PAINT® Black Sponge


Pointers:
  • Don't neglect this sponge- works well to keep the skin smoother.
  • Dry this well- squeeze out water by placing it between your palms and excess water by using the same method with a towel around it.
  • Best to air-dry it in a mesh pouch like the one in the photo above- prevents the sponge from ripping apart.
  • Use the sponge when it is moist and only with water.
Previously, I used to use the sponge to aid in washing off the soap but I realised that it only degrades it faster. So, only use the sponge after you rinse off in the shower and massage it over your face gently focusing on your T-zone areas.

~~~

Personally, I have experienced a pretty positive outcome with Black Paint's skincare range. However, it has come to my attention that the result varies with individuals (due to different lifestyle, body's reaction to ingredients). Hence, I would recommend starting out with the trial set (good for a month's worth) first to test the products out and to judge on its effectiveness yourself!

For more details & promotions of  Black Paint®:

Or
Read all of my BLACK PAINT® related posts HERE


Black Paint® is available at: 
ISETAN, B2 Westgate Mall Jurong East, 3 Gateway Drive, S608532
And
Takashimaya Department Store, B1 (Cashier at Bed Linen Area)


SPECIAL PROMOTION

Black Paint is having 50% OFF on Black Paint Trial Set.
Discounted Price - $59.99. Hurry up, limited time offer!

0 comments:

Tokyo Luxey: Sign Up Promotion

Christmas is around the corner and what better way to gift yourself than with some makeup, complementary from Tokyo Luxey!


What's Up For Grabs?


Pressed powder foundation and stick foundation by 24h Cosme, worth of US$60

*Packaging might differ from the picture, brush not included.

Only 180 bags available.First come first served!


How To Get It?
All you need to do is to sign up as a Luxey!


And Here's the catch:

You need to help me get 5 ladies to sign up and we all get the gift (but only 180 bags available)!


So, do remember to state that you are referred by me!

Name: Jody Liu

Email: Jodulu@gmail.com


Go and sign up now!


1 comments:

Topricin: Pain Cream and Foot Therapy Cream [Sponsored Review]

A while back, I was contacted by a very interesting company and was asked to review their products.

They are none other than Topricin, developed in 1994 as a proprietary innovative pain management and healing technology that bridges the gap between well-researched natural medicine and conventional care.

What caught my attention was that it is a natural pain relief cream formulated without parabens, petroleum or other harmful ingredients!


How does Topricin work? 

Topricin’s biomedicines help balance the body’s healing process and assist it to drain toxins and fluid build-up from the affected area, restoring normal blood flow. Topricin is a 21st century approach to relieving pain by helping the body heal. Topricin uses no counter-irritants or chemicals such as acetaminophen, ibuprofen or naproxen. Instead of just masking pain, it stimulates the body’s desire to repair the damaged cells causing the pain. No pills, no chemicals, no side effects, just pure healing relief.

That's not all, Topricin is currently having a very meaningful campaign "Get Relief, Give Relief": 


For every purchase of Topricin, Topricin Foot Therapy, or Topricin for Children ordered directly from them, they will donate a tube of Topricin to a credible pain clinic on our behalf…For Free!

Pretty awesome, huh~
So, what are Topricin Pain Cream and Foot Therapy Cream good for?
Let me share them with you:


Topricin provides pain relief by improving circulation and attracting and stimulating the body's healing chemistries at the site of pain. Topricin delivers reliable pain relief, improving quality-of-life, and providing a strong adjunct to professional care with no side effects or contraindications.


To Use:

Generously apply 3 to 4 times daily or more if needed, 3 inches on and around affected area. 
Massage in until absorbed 
Use before and after sports workouts and competitions 
Apply immediately for acute trauma (sprain, strain, bruise, impact or crushing injury). 
Seek immediate medical attention if pain or swelling is severe. 
Reapply before bedtime and in the morning 

Store at room temperature, and tightly secure cap after use 

Head over HERE for specific application techniques for specific problems 

VERDICT

Texture: Gel, non-greasy


Smell: No scent

Ingredients (Arranged alphabetically):
Aesculus hippocastanum, Arnica montana, Belladonna, Crotalus horridus, Echinacea, Graphites, Heloderma, Lachesis mutus, Naja tripudians, Rhus toxicodendron, Ruta graveolens

Inactive Ingredients:
Purified Water with solvent-free Coconut Oil, Vegetable Glycerin, Medium Chain Triglyceride

Benefits:
Safe, gentle and help the body heal
Safe for adults, the elderly, diabetics, pregnant and nursing women, and children (for children under age 2 consult pediatrician)
Will not interfere with any medication you may be taking
No odor or fragrance
No petroleum
No mineral oil
No parabens
Non-greasy
Non-staining

Cost: US$16.95

Product Rating: 6/10
This works well for minor sores, aches and pain but not for chronic pains or more serious bruises. I personally use it for my stiff neck and lower back aches caused by sitting in the chair for long hours and hunching when I'm using my laptop. I highly suspect that it doesnt work as well as it does for the western users because the pain relief cream we have in our Asia region contains stronger doses of pain reliever and hence, our body requires something stronger. 

The plus point is that if you are not completely satisfied with it, you can return to the point of purchase within 30days for a full and unconditional return!

It is not greasy like some other pain relief creams and absorbs relatively fast but it does leave a very thin layer on the skin. I think it is great that it has no detectable scent. It does feel cooling on contact, great for a climate like Singapore.


Award winning Topricin Foot Therapy Cream is specially formulated to effectively treat foot and ankle pain. It is perfect for common sports injuries such as plantar fasciitis, achilles tendonitis, strains, sprains, leg cramps, and impact injuries and bruising. It is effective for heel pain, gouty arthritis, peripheral neuropathic pain and neuroma. This also offers soothing treatment for swelling and soreness and effectively treats skin conditions of the feet.


By stimulating the body's desire to heal the damage that is causing the pain, Topricin Foot Therapy Cream drains the toxins and fluids that build up in an injured area to improve blood flow to the injured tissue. Made to penetrate the skin much like a moisturizer, Topricin Foot Therapy Cream is fast absorbing and paraben-free. Every airline traveler should have Topricin Foot Therapy Cream in their bag.. Ever have swollen ankles after getting off the plane? This is the perfect size - NO More swollen ankles for you!

To Use:

Generously apply 3 to 4 times daily or more if needed, 3 inches on and around affected area.
Massage in until absorbed
Reapply before bedtime and in the morning
Use before and after sports workouts and competitions
Apply immediately for acute trauma (sprain, strain, bruise, impact or crushing injury).

Store at room temperature, and tightly secure cap after use 

Head over HERE for specific application techniques for specific problems 

VERDICT


Texture: Gel, non-greasy

Smell: No scent

Ingredients (Arranged alphabetically):
Aesculus hippocastanum, Arnica montana, Belladonna, Calendula officinalis, Crotalus horridus, Echinacea, Graphites, Heloderma horridum, Lachesis mutus, Naja tripudians, Phosphorus, Rhus toxicodendron, Ruta graveolens, Sulfur

Inactive Ingredients:
Purified Water with solvent-free Coconut Oil, Vegetable Glycerin, Medium Chain Triglyceride

Benefits:
Safe, gentle and help the body heal
Safe for adults, the elderly, diabetics, pregnant and nursing women, and children (for children under age 2 consult pediatrician)
Will not interfere with any medication you may be taking
No odor or fragrance
No petroleum
No mineral oil
No parabens
Non-greasy
Non-staining

Cost: US$16.95

Product Rating: 8/10
I was skeptical after using the Topricin Pain cream, but I am amazed with this Foot Therapy cream. I have been dealing with bunion pain and soreness on my right foot for a few months now ever since May even in flats, and the usual burning sensation along with pain in the arch and ball of both feet whenever I wear heels.

Recently, I have been attending quite a few events so I was heels and as usual~ my feet were in pain after the events. So I have been applying this cream on both foot each night after the event and I have to agree that it is quite effective. The pain still does come back  from time to time but with the application of this, the pain and discomfort have lessen in frequency and intensity.

As usual, it isn't greasy and it doesn't have a scent but it does leave a layer that can be a little sticky with footwear on. Hence, I applied this cream before I go to bed and wake up to less achy feet!

0 comments: