Navigation Menu

Showing posts with label hairstyle. Show all posts

Picasso Hair Studio: My Virgin Experience with Purple Hair [Sponsored Post]

Hi, peeps!
If you have been following me on Instagram, you would have known that I went purple!

Under harsh lights

It was a bold decision for me because I have a dad who is very strict when it comes to the colour of my hair. I was brought up with the notion that as an asian, I should be proud of my natural hair colour... and my dad always make comments like "If you ever come home with this kind of hair colour (especially blond), be prepared to wake up to a bald head".

So I had a very specific request to Jesly, the Creative Director of Picasso, I want colour but it has to look refined with a kick of character.

THE PROCESS

Picasso’s Welcome
Choose your drink from a selection of drinks and receive a warm hand towel with hand cream. I always stick to Ice Lemon Tea~ 


Understand your scalp and hair
Picasso's hair designers will do a quick diagnosis of your scalp and hair.
I was told that my hair is quite healthy but I needed to dedicate some effort in keeping them hydrated.

Understand your skin tone for the most appropriate hair color
Picasso's hair designers will analyze your skin tone to determine what shades of color will fit your skin tone. I have a neutral skin tone, meaning that my veins have both green and blue shades.

Design your hairstyle with Picasso's stylist
Picasso's hair designers will discuss and design a hairstyle for your according to you preference and lifestyle. So, I told Jesly my preference and she made a sketch of her plan.

Here's the plan of my new purple hairdo!
Transformation At Work
Work in Progress


Duration: 4 hours 46 mins
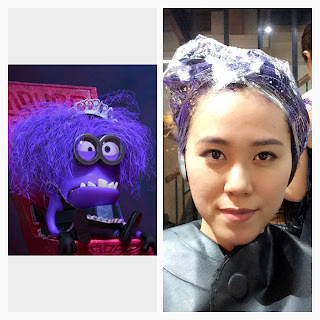
Sitting on the chair for hours made me feel like an evil minion. Haha!

Service: 
With this being my second time at Picasso, I've got to say that their service standard is constant and even the female hair dresser that I wrote about in my first post (here) has improved. In fact, despite not being her client, she noticed a blob of hair dye on the side of my face and pointed it out to get it wiped off before it stains my skin purple. So~ Thumbs up for being so aware of my situation even though she was busy with her own client.

Estimated Price Range: $60 for Hair cut, $129 for highlights, $129 for colour, $89 for bleaching

Love how sublime the colour is!
Results: I had a trim and layers that removed most of the perm I had previously, by Jesly. For colour, I went with a deep purple and highlights that was more purplish than the rest of the colour.

OVERALL

I love how sublime the colour is in general, it is only when I'm under the sunlight or if there is  bright light source that the colours will reveal itself. In fact, my family didn't notice a change to my hair colour until they saw me in daylight! Hahahaha~ 

It took me 2 tries to get this colour because the first time round, it didn''t turn out the way Jesly wanted because my hair wasn't absorbing the colour. But I'm glad that she got it right on the second session.

A thing to take note if you are new to colours, is that the colour will fade over time and it will stain everything and anything if the hair isn't completely dry. Rain was my worst nightmare when I'm in a light colour top!
Before: Dark brown with perm
After: Deep purple with hints of red-purple and copper
Current Promotion:
Colour + Intensive Hair Treatment - $199
Cut + Intensive Hair Treatment - $149
Valid til the end of Feb 2016.

Location & Contact No.
39 Haji Lane
Tel: 6291 0691

Opening Hours
Mon-Sun, 11am to 9pm
For more information, head to Picasso Hair Salon!

Picasso: My Virgin Experience with Perms [Sponsored Review]

2 weeks ago, I had the opportunity to get my hair done by the up and coming Hair Salon in Haji Lane, Picasso Hair Studio.


Since its inception late last year, Picasso Hair Studio have been gaining a reputation for its hair perming and hair colouring art services. SO like a true beauty blogger, I had to try their service out!

Location & Contact No.
39 Haji Lane
Tel: 6291 0691

Opening Hours
Mon-Sun, 11am to 9pm

Before: It was a perfect timing for a new haircut/hairstyle because my hairstyle has lost its shape and was starting to look dull.

THE PROCESS

Picasso’s Welcome
Choose your drink from a selection of drinks and receive a warm hand towel with hand cream!


Understand your scalp and hair
Picasso's hair designers will do a through diagnosis of your scalp and hair.

Understand your face shape for the best hairstyle
Picasso's hair designers will analyze your face shape to determine the best haircut/perm/rebond to complement your face shape.

Design your hairstyle with Picasso's stylist
Picasso's hair designers will discuss and design a hairstyle for your according to you preference and lifestyle.


Transformation At Work
Work in Progress

We got started with a wash first before I got my haircut.
Then it was the application of a pre-chemical lotion (a protein spray) to protect and strengthen hair before the softening process that preps the hair for curling. I had the curling rollers on for roughly 22 minutes before the curls were shaped and styled with a flat iron. Then it was time to set the curls with a solution for another 20 minutes before it was washed it off and ended with a hair treatment to seal things off.

Aftercare Tips & Photo Time

Picasso's hair designer will take some time to share some basic aftercare requirements for your hairstyle. Once done, hop over to their photo area in front of their wall mural for a quick photoshoot to be part of Picasso's collection of hairstyles.


VERDICT

Duration: A little more than 4 hours for a haircut and a combination of styling and rebounding perm.

Ambiance: It has a very clean artsy feel to the whole salon because that is their concept! I like how the mirror is set on an easel-inspired table and our finished look is the "Art Piece".

Service: I was very pleased with the greeting I got from the moment I stepped into the salon. I was warmly greeted, given a drink menu to choose a beverage of my choice that was served in a very interesting "cup", and served with a warm hand towel tray with a hand cream.

Once I was seated and ready to start on my transformation, Jeremy, the hair designer that was assigned to me start the process by finding out what I wanted for my new look and gave his recommendation based on my face shape, condition of my hair and scalp and drew it out on the consultation slip. 

He was very meticulous in explaining to me the process, and in ensuring me that it was not the final look of the perm until we were really done. Plus, he even checked if I was hungry and served me milo and some snacks to munch on.

I love the extra step taken by Picasso to ensure that once their customer walks out of the door, they can always return if they have any issues with their new hairstyle, and how they educate their customer on how to care for their new hairdo. I was taught how to blow dry and style my hair to maintain my curls, which was a first experience for me.

Price Range: $45 for my hair cut, and $299 for the perm

Results:  I got rid of my dry ends and coloured portion so now, I'm down to my shoulder with an almost virgin hair once again! Yup, I grew out all my coloured portion! And I had a gentle perm towards the ends to mimic my usual waviness but in an more organised/styled manner.

OVERALL

I am very pleased with the results, in fact, I'm totally comfortable with the results and have no issues adjusting to my new look despite the fact that this is the first time getting perms! I love how they are very through with their consultation, even taking the step to draw the concept out. 

The only negative feedback I have is with one of their hair designer that I find her hair washing skills and hair care mannerism a little off-putting. She did my hair wash towards the end and the issues I had with her was firstly she started washing my hair immediately with slightly hot water without testing the temperature (only to realise later that it was quite hot and asked me how I feel about the temperature before lowering it) and she had her fingernails scratching my scalp as she washed... which to me is a novice mistake. The other portion that caught my attention was when she was serving another customer, she used a hair brush to comb out the customer's wet hair and the customer was horrified at the way she was combing out. I feel the customer's horror because I thought that we shouldn't comb hair like that when it's wet because it will break... which was the customer's concern but that hair designer denied it, saying that it's alright until Jeremy voiced out to use a wide tooth comb to comb the hair out instead. But if you ask me, it made no difference because I saw her yanking the customer's hair out with that comb...

That being said, this is the first encounter I have with a hair salon that takes their aftercare services seriously, to the point of letting the customers have a hand at styling their own new hairdo at the end to allow them to know how to care for it on their own. They were very precise in their instructions too, and here's my aftercare notes:

Aftercare How To Style Guide:
  1. Apply sculpting lotion to wet hair
  2. Blow dry hair as per normal until it's 80% dry (Heat: hot, full blast)
  3. Split hair to 2 sections, more if I want more curls
  4. Loosely twist hair (twice or once) outwards and cup it with hand while directing the blowdryer down into them (Heat: medium, full/ medium blast)
  5. Run fingers through once done to loosen up the curls for a more natural finish


So based on my overall experience, I definitely highly recommend having Jeremy as your hair designer if you are looking for a new hairdo and Picasso as the salon for natural looking perms!

Special Promotion for Mefitters!
 Be a Mefitters today and receive a 20% discount off Ala Carte services, excluding promotion packages! Simply flash your Mefitted profile to claim for your discount. 
*Valid for First-timer Mefitters only.

This post has been brought to you by Mefitted.com, the world's first interactive directory for grooming, beauty and style.

GlamPalm: How To Get Shiny Straight Hair

Hey hey! I'm just going to jump straight into topic (pun intended) of how to achieve Shiny Straight Hair, especially if your hair's condition is far from shiny and straight.


So, if you are like me...
You hair tends to have a life of its own, is wavy or curly, has been dyed way~ too many times and you heaps of baby hairs...
Continue reading to find out how I keep my hair looking neat, tame and healthy.


First off, I always recommend using a product to protect your hair from any type of heat. Here, I am using TRESemme Thermal Creations Heat Tamer Leave-In Spray. I chanced upon this baby since I was 17 and I have been using this product ever since.

That being said, I could actually skip this step with GlamPalm's 501 Hair Styler because its plates are infused with crystal technology that heals hair with heat! So no harm done *wink*

The second product you need is a comb or a brush, here~ I am using an all-natural boar bristles brush. Why? Because it helps reduce frizz and static, improves the overall condition of your hair, and helps to grip the hairs securely later with the use of the flat iron.

The third product is a flat hair straighter!

Read this post here to learn more about my Glampalm's 501 hair styler and on how I create curls with it!


STEPS

1) Prep your hair by misting it with a heat protectant, 6-8 inches away from mid-shaft to ends.

2) Brush to distribute the product evenly. You may use your fingers for this step.

3) Then, start by parting your hair into sections. Work with small sections, I have quite a lot of hair... so I broke mine into 12 sections.

4) Turn on your flat iron beforehand if it takes time to heat up. My Glampalm 501 takes roughly 15 seconds to heat up to 150°C, which is roughly the time I take to pick my hair section and prep it for the styling.

5) Start by taking your first section, brush through it to ensure that there are no knots. Then, with the brush gripping onto the section of the hair, place it between the flat iron, clamp down and glide down with the brush leading the way. Before the flat iron reaches 1/3 of the end, bring your brush back up to the roots and repeat the steps again. I usually go through the sections 2 times, more if the section is bigger.

6) Repeat for the rest of the sections.
7) You may end once you managed to straighten you hair out, but if you are like me with baby hairs and damaged hair ends~ You may want to use a hair serum of your choice and to fix flyaways down with hairspray.

For me, I'm using Origins Crystal Serum. I was introduced to this serum by my mum, and have been using it for 4 years now. Ideally, look for a hair serum that is nourishing and one that doesn't weigh your hair down, because (especially) with this straight hairstyle, as it may end up making your hair look limp.

I usually use 2 pumps of this serum, and warm it up between my palms before applying it from the hair ends, and slowly working my way up to the roots.

I generally try to avoid hairspray because its bad for the hair and the environment, so I stick to my hair serum only and ignore any flyaways that are too stubborn.

And we are done!

Overall, the whole process took me only 10 minutes because of the fast heat-up and the smart crystal technology of GlamPalm's plates, that helps to smooth out the cuticle layer of the hair for that soft shiny result!

Here's the before, mid-way and after look, on the left I did a slight curl inwards. While on the right, I simply drag the styler down.

You can choose to end of with either, I generally do a slight curl inwards because a straight down look actually makes me look fiercer than I really am. Haha!

To achieve that curl towards the end, just twist your flat iron inwards and up a little for a softer look!

Thats~ all!

Thanks for stopping by and reading this post!


Special Promotion

Apply the code of "JODY15" after Paypal Billing Information page to get $15 OFF your very own GlamPalm Hair Styler purchase!

This tutorial has been brought to you by GlamPalm.com.sg, the pioneer in hair styling industry, with the sponsorship of this GP501 Hair Styler used in this post.

GlamPalm: Creating curls with GP501

Hey hey,
I've got an interesting product to share with all of you today!

Are you like me, a noob at styling your hair, and yet you want to be able to learn and style-it-yourself? Well~ Recently, I was introduced to a hair styler iron that claims to utilise the technology of healing stone ores to not only protect the hair from damage, but it also emits molecules found in nature that provides exceptional therapeutic benefits to its users!


Want to know more?
Just continue reading!

So, the process of finding out which GlamPalm Hair Styler is for you is really easy.
Simply head over to their Styler Guide to figure out which model of their Hair Styler is suitable for you based on your hair type, length and styling preference! 

Personally, my hair is normal and long, and I wanted something that can curl and straighten my hair with. So, the model GP501 suits my criteria the best and that's what I got!


The GP501 Hair Styler comes in a pretty black box, along with a luxury travel pouch (that can also be used a as clutch) and 2 sectioning clips. 

And here's a close up image of my GP501:


So what are the Unique Features of GlamPalm Hair Styler?

  • It comes with a protector cover that can be used to keep the iron clamped shut to store aside after use without burning the cover or its surrounding.
  • It has groves at its tip for users to grab onto, especially during the process of curling that hair.
  • Its ceramic plates are infused with the technology of Healing Stone Ores that emits therapeutic molecules that are also found in nature and prevents hair damage while making the hair softer and glossier.
  • It has a 360 degree swivel cord that prevents users from being tangled up in wires and damage to the cord from prolong usage as the cord rotates as users twist and turn the styler around.


How does GP501 operate?


  • It has a simple straight forward On/Off switch.
  • It has 11 different heat settings ranging from 100°C to 200°C.
  • It takes a maximum of 15 seconds for the iron to heat up.
Note: Under the Styler Guide page, there is also a guide to advice upon the heat setting for different type of hairstyles for different type of hair.

Personally, I stick between 150°C to 180°C to style my hair. I find that it's more manageable to work between these heat setting as I tend to go over the same section twice or more (because I'm still getting a hang on this). Anything higher and the style is harder to correct after.


How to use GP501 to create curls?

Watch this quick video of mine:


Tips

  • Be mindful of how you part your hair and the overall direction of how you curl as this will determine the end result. 
  • I found that it is easier to curl and manage the hair when working with smaller section, it also helps to run the iron down the section of the hair slowly for better result.
  • I will admit now that it takes a few trials to get used to the steps and the movements, so practice makes perfect!


Special Promotion

Apply the code of "JODY15" after Paypal Billing Information page to get $15 OFF your very own GlamPalm Hair Styler purchase!

This tutorial has been brought to you by GlamPalm.com.sg, the pioneer in hair styling industry, with the sponsorship of this GP501 Hair Styler used in this post.

Y.S Hair Studio: Great place to check out for a new do

Hey hey!!
I did something drastic recently...
I chopped off my long locks!


I have had long hair for years now for pageants and sorts...
In fact, I was required to have my hair long.
However, keeping hair as long and thick as mine in a climate like Singapore...
It was killing me.
Hahaha!

So, I decided that I need a change and to do something about my hair because I was also getting headaches from the weight of it.

Now~ I am not too sure about you but I am very particular about who I trust my hair with.
Until recently, I was still on my search for a hair stylist that can work magic on my crowning glory.
So, once I found THE hair stylist I'm hooked and recently, he opened his own studio.


Hair Stylist:
Ace
Contact Number: 9785 9847

Opening Hours:
Daily open from 10am - 8pm
Close on Thursday

Address:

So previously, most of the photos of curled hair and dyed hair were all done by him!
Naturally, now when I am determined on doing something drastic, I look for him.


To be honest, I was so happy with cutting away a huge chunk of my hair. I didnt feel like it was a waste etc.
The main portion of my hair has been pretty dry with all the dying, in fact, I am trying to grow the coloured parts out.

It's not bob short length but this has been the shortest my hair has ever been in years and it's been refreshing!


Before and After with blown out curls!


Without the curls, my hair looks like that below!


Right now, I got a pretty cool promotion for my readers if you are looking for a new do!
Y.S Hair Studio is offering
2 for the price of 1 service for haircut
(Payment will be on the higher rate)
Simply quote "Jody" when you make an appointment with him 
via his number or when you meet him in the studio!

So you can bring your mum, daughter, son, father, friend, partner along for this deal!
This offer is valid for the month of October only!

Besides, haircuts~ Ace is a great at styling hair for events (my pageant hairdos were all done by him) and a master at hair dyes!